
Exploring how Ukranians use Pysanky to celebrate Easter: How to Make them Yourself
A beautiful tradition, Pysanky gives us time to think about the plight of people in Ukraine today. Every Easter season Pysanky eggs make an appearance. These decorated eggs are an important cultural ritual that brings families together each Easter.
With the Easter season here everybody’s celebrated in their own fashion with family and friends. Putting out easter baskets filled with candy and using store bought kits to dye easter eggs are activities dating back centuries by many cultures including Christians, Russians, Romanians, and many more. While America doesn’t share the same beautiful tradition as Ukrainians, both customs involve similar activities.
Think about cultural traditions that bring you closers. Many Catholics and Christians go to church on Easter Sunday. Churches hold services with special traditions sometimes including egg hunts for the children. Typically, families go early in the morning, dressed in formal springtime attire, and come together to celebrate their beliefs.
The Pysanky egg is a symbol of fertility, celebrating the rebirth of nature in the spring, and the rebirth of Christ at Easter, similar to Christian tradition in America, but these are no ordinary eggs. Pysanky are filled with traditional folk designs using a wax-resist method, inscribing designs and words with beeswax. Times have changed and there are more resources to be used now, but centuries ago Ukranians used natural colors to dye the eggs. Yellow dye was made from apple bark, buckwheat husks, or lilac. Orange dye came from walnut or oak bark, Green dye came from sunflower seeds or elderberries, red dye came from deer horn, sandalwood or birch leaves, and black dye came from black maple leaves. Once the Pysanky is finished, they are varnished to preserve and displayed on special stands.
Member of Lancer Media, Emily Lotito has a Ukrainian background with her grandmother carrying on the Psysanky tradition, displaying her very own eggs for everyone to see. Emily states that most that her grandma owns are very fragile because they are made from porcelain so they will last long and not spoil. She places the eggs in a showcase cabinet with clear glass so visitors can view the decor.
To make these eggs yourself there are kits available to buy that have all the essential tools needed. Supplies include 3 sizes (thin, medium, thick) of kistka- a stylus used to hold and apply melted beeswax onto eggs, Ukrainian Easter egg dyes, and beeswax (no other wax will work). In addition there are household groceries and items needed for this artwork, which will be linked below with full instructions.
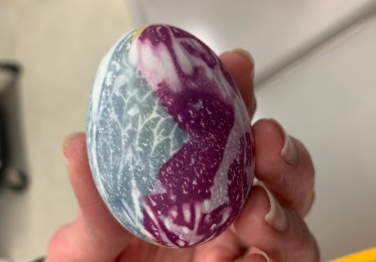
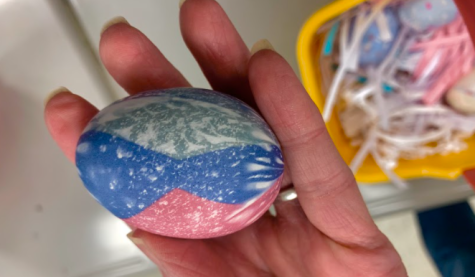
 With limited time and budget, Lancer Media decided to recreate these eggs in an easier fashion. Silk tie eggs have a similar outcome with much more simple steps and ingredients.
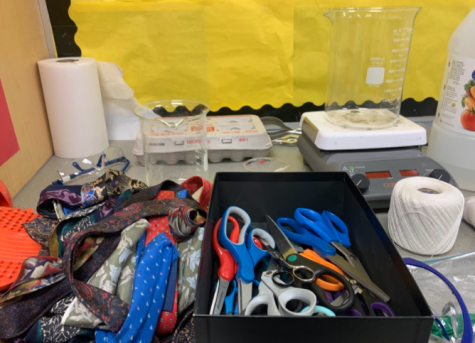
The class used the Martha Stewart Silk-Tie dying method to accomplish this task. It was definitely a group effort with the class helping out by bringing in materials such as old silk ties, scraps of white cloth, and even made hard boiled eggs for each student.
For this activity supplies needed include:
-
Hard boiled eggs
-
Genuine silk ties or other silk fabric
-
String or twist ties
-
Scissors
-
White vinegar
-
Water
-
Tongs
-
White cloth such as pillowcases or scrap material
-
A pot with a hot surface such as a stove (in this case a hot plate)
There are only five simple steps for you to create this artwork:
First, wrap the egg in silk material, making sure the printed side is directly on the egg and secure with a twist tie.
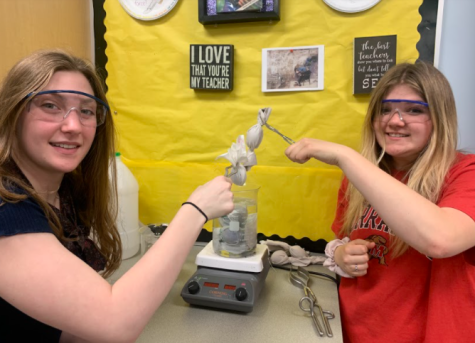
Second, cut the white fabric into pieces large enough to cover the entire egg and secure tightly on top of the silk with string. Tie in knots tight enough to make sure the egg doesn’t slip, but not enough to where you can’t cut it without breaking the egg.
Third, place eggs in the pot filled with enough water to fully submerge the eggs. Once the eggs are in, add three tablespoons of white vinegar, bring the water to a boil, and then let simmer for 20 minutes.
Fourth, remove the eggs from the pot with tongs or a wooden spoon and let cool completely.
Last, Unwrap the eggs carefully and reveal the colored and detailed designs.
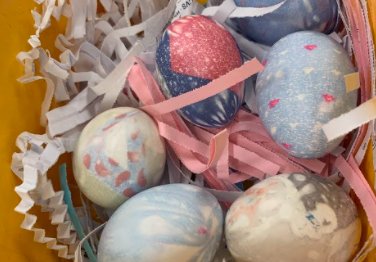
Try it and tweet @LHSJournalism with your results!!
Your donation will support the student journalists of Linganore High School. Your contribution will allow us to purchase camera/recording equipment and software. We hope to raise enough money to re-start a monthly printed issue of our paper.